
USB Creator Tool Guide
In this tool I have chosen a – hopefully understandable – simple but from MSFT „fully supported“ approach.
This thing started several months ago with a simple PowerShell script.
The reason / motivation was the creation of a USB stick that can also handle the >4GB WIM files of current Windows 10 Editions and does NOT have to take the detour via splitted WIMs (SWM files) 😊
(The latter is done by several other approaches & tools, some of them use ESD files instead of WIMs).
In parallel, Michael Niehaus and Johan Arwidmark have obviously been working on something similar, which of course stimulated & confirmed me 😊
Blog by Johan:
A Blast From The Past – Jurassic Deployment – Deployment Research
Blog by Michael:
Booting your own Windows PE image – Out of Office Hours (oofhours.com)
Requirements
The tool works only under the following conditions:
- You have FULLY Local Admin rights on the box where you want to use the tool (start PowerShell or PowerShell ISE as ADMIN, Execution-Policy must be at least „RemoteSigned“)
- Latest ADK for Windows 10 is installed
- Latest WinPE addon for ADK Windows 10 is installed
- Latest PowerShell (Host 5.x upwards) is at the start
- .Net Framework 4.7 and up is installed (part of PS 5.0)
ADK for Windows 10
http://go.microsoft.com/fwlink/p/?LinkId=526740&ocid=tia-235208000
WinPE Addon for ADK for Windows 10
https://go.microsoft.com/fwlink/?linkid=2120253
The tool checks the presence of the usual installation directories of the above components 😊
It also builds (among other things) a fresh new WinPE X64 root directory (for the FAT32 boot partition of the USB stick) if it does not exist; the contents of the „media“ directory are copied (except for the WinPE standard boot.wim in it) to the first (FAT32) boot partition of the stick.
IMPORTANT:
You should connect only exactly ONE USB medium (stick) to the box, where you (as ADMIN! ) started the tool, of which you know for sure that this media could be reformatted by the tool !!!
No Risk, No Fun 😊
Since current UEFI/GPT machines cannot boot from NTFS USB drives, the USB media is split into two partitions (a small FAT32 for the boot code and the rest as a large NTFS partition with the installation sources) – unlike the Rufus tool, for example.
The tool also checks the necessary admin rights & warns accordingly 😊
Also the formatting process (of the – if connected & found – USB drive) is – by default – only possible with „Confirm“ messages, unless you change the „Confirm“ in the corresponding USBCREATOR.xml 😊
In order to have some kind of progress indicator for the various Robocopy jobs within the flow in the GUI version of the tool, I found and implemented the Copy-ItemWithProgress function by Keith Garner after a long search:
Admittedly this looks – at runtime – a bit „fancy“ (umpteen popups), but better to see some kind of progress than a „not responsive“ app 😊
The current version can also add necessary drivers (network, keyboard, storage) to the Boot.wim (on the FAT32 boot partition of the stick), which is often necessary with current hardware (USB 3, NVMe SSDs, current Surface models, etc.), because otherwise neither keyboard nor network nor local hard disks may be „found“ 😊
For this purpose only a suitable directory (with the WinPE X64 drivers for these devices) must be provided, for which e.g. a corresponding MDT Out-of-Box Drivers directory is suitable, see below.
The tool reads its configuration from an XML file (USBCreator.xml), which must be located in the same directory as the tool itself.
In the XML (USBCreator.xml) you can also define the minimum size of the USB media (in bytes!) (default is 28 GB = 30064771072 bytes).
Finally – if needed – various files for customizing are copied into the $OEM$ folder of the NTFS installation partition of the USB stick, furthermore a simple but effective Unattend script as „AutoUnattend.xml“ is copied from the AutoUnattend root directory into the root of the (FAT32) boot partition, where also the setup.exe is located, which should attract the same 😊
The latter does a „zero touch installation“ of a vanilla image based on the respective ISO with all the stuff you need for it; so put the ready built USB stick into a fresh new box, boot from it (usually via F12 or ENTER or F1 click) and let it do 😊
The original PowerShell script („naked“ prepare-usb-w10-install-1.ps1, has no GUI!) you can of course use alternatively to the GUI version 😊
The same uses the „usual“ progress indicators of PowerShell.
Here you’ll find ALL needed files, the tool itself as GUI Runtime Version (USBCreator.exe) as well as the native PowerShell Script (prepare-usb-w10-install-1.ps1) and all samples for the addons (Autounattend,xml, $OEM$ Files, Lenovo Driver Install Dir …)
BugFixes & wishes are also gladly taken 😊
GUI elements

1 Enter W10 ISO File Location
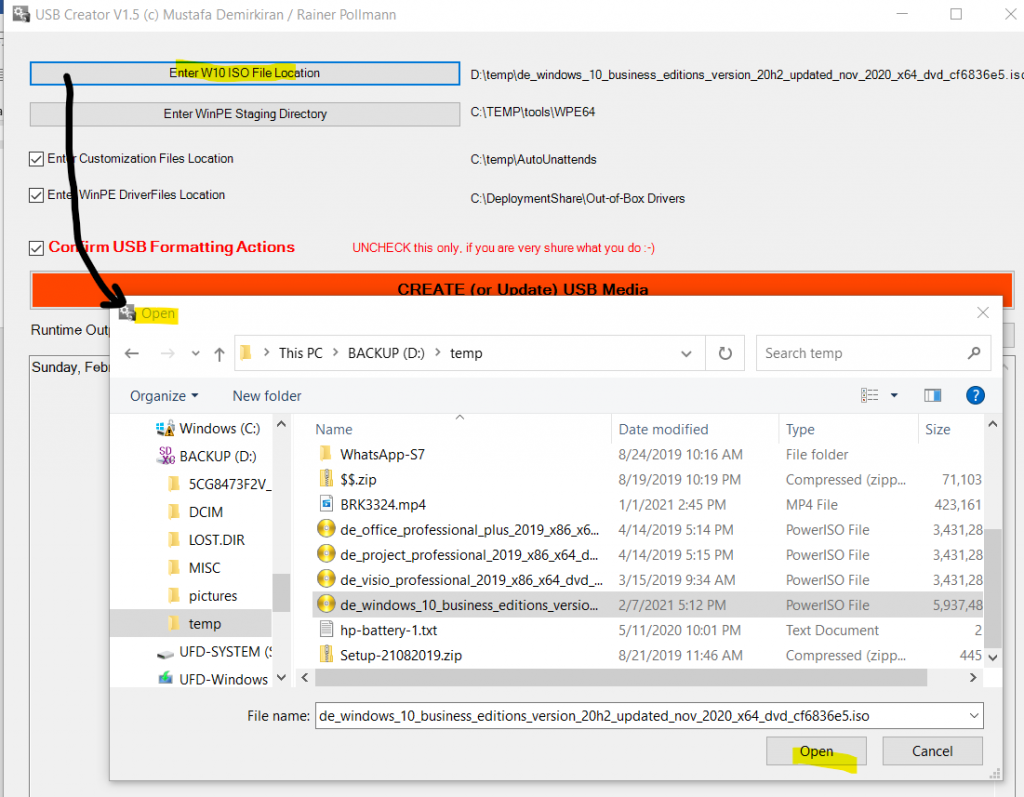
Starts a file browser, selected (ISO!) file gets copied into the text field to the right of it
2 Enter WinPE Staging Directory
Starts a directory browser; in this directory the AMD64 WinPE is expected or generated if not already present.
The latter is controlled by the script Create_WinPE64_Root.cmd, which must be located in the same directory as the tool.
3 Enter Customization File Location
Starts a directory browser if set. All files in this directory are copied to the $OEM$ folder of the NTFS partition (installation sources).

Typical directory, the Autounattend.xml gets NOT copied, but will later be copied to the root of the boot partition (see above)
Reminder:
All files in $1 end up on the finished machine on the root (C: )
All files in $$ end up on the finished machine in %windir%, i.e. usually in c:\windows
This mechanism still works 😊
This can be used to „transport“ things like wallpapers, customization scripts, JSON files, etc. so that they remain on the local disk even after a potential SysPrep.
If you uncheck the checkbox, the directory will be set to „none“ & NO Robocopy actions will be performed on it.
4 Enter WinPE DriverFiles Location
Starts a directory browser if set.
All PnP drivers in it are built into the boot image (recursively!) based on their INF files.
Therefore it is best to use a suitable out-of-box drivers folder, e.g. from an MDT share as shown above.
Unchecking the checkbox sets the directory to „none“ & the boot.wim remains in its original state (as in the installation ISO).
5 Confirm USB Formatting Actions
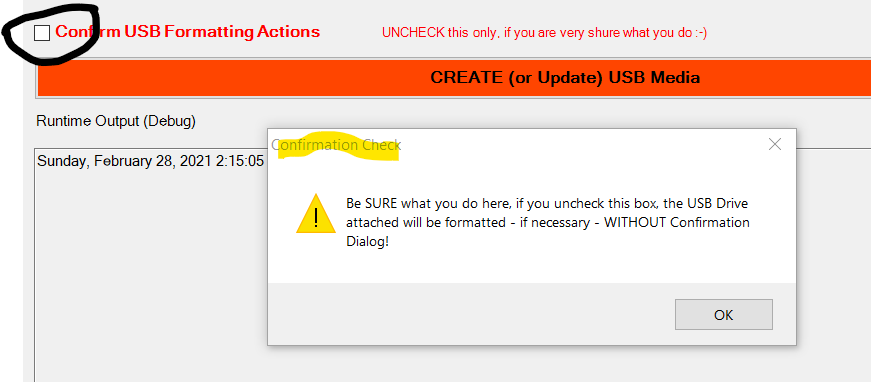
Outputs a clear warning 😊
If the checkbox is not set, the system will NOT ask before formatting the USB medium!
6 CREATE (or Update) USB Media
Performs the „actual“ actions, including partitioning and formatting the USB stick (!)
If the stick already has the correct structure (S: LW, Z: LW, etc.), the stick will be updated WITHOUT formatting (e.g. new ISO, new drivers …).
7 Quit
Exits the tool; the Config XML (USBCreator.xml) is also written back here, because changes may have been made to the above-mentioned parameters in the GUI 😊
8 Runtime Output (Debug)
All actions of the tool are output in this area.

Completed run, after clicking OK the Config XML is written back and the tool is closed.
Here you’ll find ALL needed files, the tool itself as GUI Runtime Version (USBCreator.exe) as well as the native PowerShell Script (prepare-usb-w10-install-1.ps1) and all samples for the addons (Autounattend,xml, $OEM$ Files, Lenovo Driver Install Dir …)